What is the purpose of an isotype control?
To estimate the contribution of the non-specific interaction and Fc receptor binding, staining protocols using an antibody directed to an irrelevant antigen (for example, DNP) having the same isotype as the antibody of interest may be analyzed in parallel with the antibody of interest. The antibody directed to the irrelevant antigen is known as the isotype control.
Antibodies are useful for identifying and localizing proteins and other antigens both on the surface of cells as wells as inside cells. The utility of antibodies lies in their specificity and avidity for their antigens, an interaction which is mediated by the antigen binding sites. Antibodies can also react with components other than their antigens in several ways. They can associate with cellular components by non-specific protein-protein interactions. They can associate with fatty components by hydrophobic interaction. Antibodies can also bind to antibody receptors expressed on the surface of some cell types. For example, antibodies of the IgG class can bind to the cell surface Fc receptors known as CD16, CD32, and CD64. Under ideal conditions, various types of non-specific binding will be prevented by including blocking proteins (BSA, milk, or animal serum products) in antibody incubation reaction mixtures. Antibody binding to Fc receptors can be prevented by preincubation of cells with serum preparations containing immunoglobulins.
Will ProcartaPlex multiplex assays give me the same results for each analyte as my current ELISA tests?
ProcartaPlex multiplex assays, which are based on Luminex xMAP technology, provide a versatile platform that gives users more flexibility and a greater array of options for analyte detection. Whether you are testing for single or multiple analytes, ProcartaPlex multiplex assays deliver accurate analytical performance using efficient, easy-to-follow protocols. Each of these assays has undergone the same development, validation, manufacturing, and quality control standardization we conduct for our ELISAs. Each lot of ProcartaPlex multiplex assays as well as ELISA assays is fully qualified with the appropriate sample type (i.e., species-specific serum, plasma, and cell culture supernatants), and each lot is evaluated based on the following performance characteristics:
Specificity-each analyte is screened to make sure there is no significant cross-reactivity with other analytes in the multiplex test
Sensitivity-each analyte is evaluated for both functional sensitivity (differentiation from background) and lower limit of detection (LLOD)
Precision/accuracy-multiplex assays have good intra-assay precision (<10% CV), inter-assay precision (<10% CV), and lot-to-lot consistency (<20% CV); these values are comparable to or better than most ELISA tests
ProcartaPlex multiplex assays are regularly tested against the matching ELISAs. Therefore, you can switch easily from ProcartaPlex assays to ELISA and vice versa with reliable results. Most of our ProcartaPlex assays use the same antibody pairs as our traditional plate-based ELISAs, resulting in high correlation (R2 > 0.9) between the two assays.
Why should I consider switching from ELISA technology to multiplexing?
ELISA is a simple and powerful way to quantify individual proteins specifically in complex samples. The selectivity of ELISA is achieved through the use of qualified single- or double-antibody sandwich technology, and accurate quantitation is achieved through the use of calibrated standards. ELISAs can detect low-level proteins and can be performed in a 96-well format with only 60 minutes of hands-on time. In addition, the results obtained with ELISAs are generally very reproducible. While ELISA has been established as a standard method of protein analysis, multiplexing methods that enable the measurement of multiple analytes simultaneously in a single sample address a number of specific limitations:
ELISA allows for the measurement of only one analyte at a time in a given sample, limiting investigators' increasing need to measure multiple targets in their research studies.
The low available volume of many samples being studied may limit the number of times analyses can be conducted. This is especially true in small animal research, in pediatric testing, and in microplate assays providing limited sample volumes. The ability to assay multiple analytes in a single small-volume sample enables more effective use of each sample.
Difficulties in data interpretation can arise when comparing analyte levels measured by multiple ELISAs, each assay having been performed with different sample aliquots and each susceptible to systematic errors leading to decreased precision and accuracy.
Many analytes require assays with broad dynamic ranges to avoid repeat testing or out-of-range values. Multiplex assays can be designed to have large dynamic ranges for all of the analytes, or ranges tailored to various expected analyte concentrations.
I performed an ELISA assay, and the A450 readings for my duplicate wells were very inconsistent. What could have gone wrong?
Here are possible causes and solutions:
Errors in pipetting the standards or samples or in subsequent steps. Always dispense into wells quickly and in the same order. Do not touch the pipette tip on the individual microwells when dispensing. Use calibrated pipettes and the appropriate tips for that device. Check for any leaks in the pipette tip.
Repetitive use of tips for several samples or different reagents. Use fresh tips for each sample or reagent transfer.
Wells have been scratched with the pipette tip or washing tips. Use caution when dispensing into and aspirating out of microwells.
Liquid transferred from well to well during incubations. Adjust the orbital shaker or check for correct rotator rpm. Peel the adhesive plate cover off carefully.
Incorrect volumes of materials dispensed into the microwells. Follow the protocol for dispensing volumes of reagents. Check calibration of the pipettes.
Standard diluted with the serum, culture medium, or other buffer. Dilute the standard with the standard diluent buffer provided in the kit.
Particulates or precipitates present in the samples. Remove any particulates/precipitates by centrifugation prior to dispensing into the assay.
Dirty microwells: visible debris within or on bottom of microwells. Inspect the microwells and invert the plate to remove debris. Wipe the bottom of the plate with an absorbent tissue after each wash step. Never insert tissue into the microwells.
“Edge effect” due to uneven temperature between the outer-edge wells and the wells in the center of the plate. Seal the plate completely with a cover during incubations, and place the plate in the center of the incubator when 37 degrees C incubation is indicated.
I got a poor standard curve after my ELISA. Why is this?
Here are possible causes and solutions:
Improper preparation of standard stock solution.Dilute the lyophilized standard as directed on the vial label, only with the standard diluent buffer or a diluent that most closely matches the matrix of your sample.
Reagents (lyophilized standard, standard diluent buffer, etc.) from different kits, with either different analytes or different lot numbers, were substituted. Never substitute any components from another kit.
Errors in pipetting the standard or in subsequent steps. Always dispense into wells quickly and in the same order. Do not touch the pipette tips on the individual microwells when dispensing. Use calibrated pipettes and the appropriate tips for that device.
I see very weak to no color development after my ELISA. What happened?
Here are possible causes and solutions:
Reagents not at room temperature (approximately 25 plus or minus 2 degrees C) at start of assay. Allow all reagents to warm to room temperature prior to commencing the assay.
Incorrect storage of components, e.g., not stored at 2-8 degrees C. Store all components exactly as directed in the protocol and on labels.
Anti-rabbit IgG HRP or streptavidin-HRP working solution made more than 15 minutes before use in assay. Use the diluted anti-rabbit IgG HRP or streptavidin-HRP within 15 minutes of dilution.
Expired reagents.Check expiration dates upon receipt of kit and use the kit prior to expiration.
Plate read at incorrect wavelength. The correct wavelength to read ELISAs using the TMB substrate is 450 nm.
TMB solution lost activity. Ensure that the TMB solution is clear before it is dispensed into the plate wells. A blue color and/or the presence of particulate matter indicate that the product is contaminated. Please contact Technical Support if this problem is noted. To avoid contamination, we recommend that the quantity required for an assay be dispensed into a previously unused disposable trough for pipetting. Discard any TMB solution left in the trough and do not put it back in the bottle. Avoid contact between the TMB solution and items containing metal ions. Do not cover your plates with aluminum foil or aluminum-coated Mylar sheets because this can cause color development in the absence of HRP.
Attempt to measure analyte in a matrix for which the ELISA assay is not optimized. Contact Technical Support when using alternative sample types.
Wells have been scratched with pipette tip or washing tips. Use caution when dispensing into and aspirating out of microwells.
Incorrect chromogen or stop solution used. Use only the chromogen and stop solution supplied with the kit.
Standard diluent buffer added to all wells rather than the designated wells. Follow the protocol and only add the standard diluent to the designated wells and to the samples where it is required, or to samples producing signals greater than that of the highest standard.
Use of buffer containing azide, which is not compatible with HRP. Avoid the use of azide in the assay.
I have an elevated optical density (OD) reading for my ELISA standard. What went wrong?
Here are possible causes and solutions:
Incorrect dilution of the anti-rabbit IgG HRP or streptavidin-HRP working solution.
Warm the solution of anti-rabbit IgG HRP or streptavidin-HRP (100X) to room temperature, draw it up slowly, and wipe the tip with a laboratory tissue (e.g., Kimwipe tissue) to remove the excess. Dilute only in the HRP diluent provided.
Incubation times extended. Follow incubation times outlined in the protocol.
Incubations performed at 37 degrees C. Perform incubations at room temperature (approximately 25 plus or minus 2 degrees C) when instructed in the protocol.
I am getting an elevated background in my ELISA. What should I do?
Here are possible causes and solutions:
Insufficient washing and/or draining of wells after washing. Residual solution containing anti-rabbit IgG HRP or streptavidin-HRP can elevate the background if left in the well.
Wash according to the protocol. Verify the function of the automated plate washer. At the end of each washing step, invert the plate on absorbent tissue on the countertop and allow it to completely drain, tapping forcefully if necessary to remove residual fluid.
Chromogen exposed to light prior to use, resulting in a blue color.
Keep chromogen in its vial until you are ready to dispense it into the plate, and then pour it into a reservoir to prevent contamination of the vial with equipment. Do not cover the plate with foil.
Incubation time is too long or incubation temperature is too high.
Reduce incubation time and/or temperature.
Contamination of pipette, dispensing reservoir, or substrate solution with anti-rabbit IgG HRP or streptavidin-HRP.
Do not use chromogen that appears blue prior to dispensing onto the plate. Obtain a new vial of chromogen.
Blanks that have been set up improperly.
Follow the protocol when designating blank wells. Blank wells contain only chromogen and stop solution. Subtract blank well results from all other wells.
Incorrect dilution of standard stock solution or standards diluted in serum, culture supernatant, or other.
Follow the protocol instructions regarding dilution of the standard. Dilute standards only in the Standard Diluent Buffer provided in the kit.
After I added the chromogen reagent to the plate, I incubated the ELISA as suggested in the manual, but the A450 of the highest standard was higher than what my plate reader can read. What should I do?
Our customers use a wide variety of plate readers. Some of these can't read absorbances higher than 2 AUFS (Absorbance Units Full Scale), while others can't go beyond 3 AUFS, for example. If you read your ELISA plates after 30 minutes of incubation at room temperature and 1 or 2 A450 values are off-scale, you can shorten the incubation time. For example, some customers find that 20 minutes is the ideal incubation time because the ambient temperature in their lab is higher than approximately 2 degrees F (22 degrees C). In this case, higher temperatures increase the rate of the HRP-driven ELISA. Conversely, if the A450 values you get are not high enough, you can increase the incubation time accordingly.
The A450 values that I got for the standard curve in your ELISA kit are lower than the example values shown in the product manual. Why?
There are 2 main causes of poor ELISA standard curves. First, the recommended method for solubilizing the kit standard may not have been followed. The standard should be reconstituted according to the directions indicated on the label, using the standard diluent provided in the kit. No other diluent should be used. The vial should then be swirled or mixed gently and then allowed to sit for 10 minutes at room temperature to ensure complete solubilization. This concentrated standard solution should be used within 1 hour of reconstitution. Also, it should be mixed gently again before preparing the dilutions in standard diluent according to the instructions provided in the product manual. Leftover standard can usually be stored frozen in small aliquots, unless specified otherwise in the product manual.
The second common reason for poor standard curves is that the HRP conjugate was not diluted correctly. The 100X HRP conjugate solution contains 50% glycerol, which makes it very viscous and difficult to pipet accurately. Here is what we suggest to solve this problem: First, let the vial of HRP conjugate come to room temperature. Then, stir it gently with a clean pipet tip to make sure that it is homogeneous. Use only the separate HRP conjugate diluent provided in the kit to dilute it, and follow the dilution instructions provided in the manual.
The key to diluting the HRP conjugate is to make sure that it is pipetted correctly. You should test that your pipettor accurately aspirates and dispenses the volume of the conjugate-glycerol mixture that is required. If possible, this pipettor should be calibrated so it is accurate and reliable. When you aspirate the viscous conjugate solution, it may take 5-10 seconds for the desired amount to enter the pipet tip. Before transferring the conjugate to the appropriate HRP diluent, make sure that the outside of the pipet tip is dry by wiping it with a lab tissue (e.g., Kimwipes tissue), taking care to ensure that the contents inside the tip do not get absorbed by the tissue. Pipet the conjugate into the diluent, and then rinse out the tip by pipetting up and down several times. It is important to get every last bit of conjugate out of the tip. Next, seal the container and mix it gently but thoroughly by rocking it or turning it upside down. This is crucial because the glycerol carries the conjugate quickly down to the bottom of the tube. If the diluted conjugate is not mixed adequately, the concentration of the HRP conjugate will not be what is required.
Once the HRP conjugate is diluted and mixed gently but well, use it within 15 minutes. Remember that the HRP conjugate diluent is the only acceptable diluent for the HRP conjugate. The diluted HRP conjugate should not be saved because the HRP activity is labile, and it should never be stored and reused.
I bought one of your Antibody Pair ELISA kits, but there were no buffers included. How should I set up and run the ELISA?
Our Antibody Pair kits include matched, pre-titered and fully optimized coating and detection antibodies, 3 vials of recombinant protein standard, the streptavidin-HRP conjugate concentrate, and a lot-specific technical data sheet. The buffers are not included. The Buffer Kit needed to run the Antibody Pair ELISA must be purchased separately (Cat. No. CNB0011). Note that the 5X Assay Buffer supplied in Cat. No. CNB0011 is used to block your ELISA plates and as a diluent for the standards and samples.
I ran out of the streptavidin-HRP that came in your ELISA (or Antibody Pair) kit. Can I get more?
No. The exact same streptavidin-HRP conjugate supplied in these kits is not available as a stand-alone product. However, it is derived from our ELISA-grade streptavidin-HRP (Cat. No. SNN2004), which we do sell. Remember that the streptavidin-HRP provided in each lot of ELISA or Antibody Pair kits is also lot-specific. So, if you use Cat. No. SNN2004 or another source of streptavidin-HRP, you will have to determine which dilution of SNN2004 works best for you.
My sample lysates were made in RIPA buffer. Can I test these samples with your ELISA kits?
Yes, you can. The composition of the traditional 1X RIPA buffer is very similar to that of our Cell Extraction Buffer (Cat. No. FNN0011). Cat. No. FNN0011 is frequently used to prepare lysates for testing with our ELISA and Luminex kits. Our NP-40-based Cell Extraction Buffer (Cat. No. FNN0021) is also used. We recommend diluting lysates made with Cat. No. FNN0011 at least 10-fold in order to lower the SDS concentration to less than or equal to 0.01% (v/v) before adding the samples to the ELISA or Luminex assay.
How do your phosphospecific ELISA kits compare to immunoprecipitation (IP) and western blotting?
Our phosphospecific ELISA kits have several advantages, including ease of use and increased sensitivity. Phosphospecific ELISA kits are typically 2-10 times more sensitive than western blots, so they are particularly useful for the detection of “low-expressing” proteins or for small sample sizes. In addition, with the use of the recombinant standards provided in the kit, phosphospecific ELISAs provide quantitative results without having to perform densitometry.
How do I normalize phosphospecific ELISA results with total ELISA results?
In order to evaluate phosphorylation levels, we report comparative levels of protein phosphorylation in units of phosphoprotein per pg or ng of total protein. The total ELISA kit quantifies the mass of protein per sample, and the phosphospecific ELISA kit quantifies the phosphorylation level of that protein in units. One can then determine if phosphorylation levels (in units/pg, for instance) of various samples are similar or different.
Example: Two samples are tested for total CREB and CREB [pS133]
Sample 1 results: The total assay (KHO0231) shows 100 pg/mL of CREB in the sample. The phosphospecific ELISA (KHO0241) shows 50 units/mL of CREB [pS133]. In this sample, CREB is phosphorylated at serine 133 to the level of (50 units/mL)/(100 pg/mL) = 0.5 units/pg of total CREB.
Sample 2 results: The total assay shows 95 pg/mL of CREB in the sample. The phosphospecific ELISA results show 5 units/mL of CREB [pS133]. In this sample, CREB is phosphorylated at serine 133 to the level of (5 units/mL)/(95 pg/mL) = 0.053 units/pg of total CREB. When you compare sample 1 with sample 2, you see a 10-fold difference in the level of phosphorylation of CREB at serine 133, even though the amount of total CREB protein is nearly unchanged.
What units of measurement do you use for the results of total and phosphospecific ELISAs?
The results of our total ELISAs are given in pg/mL of sample, or sometimes ng/mL. This measurement is always given in mass units because standards of known mass are used to prepare the standard curve. The results of the phosphospecific ELISAs are given in “units”, which we do not relate to a particular mass of protein. We use units because it is difficult to precisely know the efficiency of a particular phosphorylation reaction, and therefore the ratio of phosphorylated to unphosphorylated protein, in a particular preparation of phosphoprotein standard. Phosphorylation units will be unique to each phosphospecific ELISA and are described within the product manual that accompanies each kit.
For example, a typical unit description would be “1 unit = the amount of FAK [pY397] derived from 300 pg of auto-phosphorylated FAK protein”. Since there is no guarantee that the FAK in our standard preparation is 100% phosphorylated, we refrain from making the statement that this corresponds to 300 pg of phosphorylated FAK. Instead, we validate a large batch of phosphorylated protein and use this to develop our unit definition and standard curve for our original assay. Subsequent preparations of our protein standards are normalized to the original batch of protein to ensure that our unit definitions remain constant from lot to lot.
What is the difference between your total and phosphospecific ELISA kits?
Both types of ELISA kits capture total protein, regardless of its phosphorylation state, within the wells of a plastic 96-well plate. This is done by coating the wells with a “pan-antibody” that does not distinguish between the phosphorylated and non-phosphorylated forms of a protein and does not block the phosphorylation site to be studied. In addition, a phosphospecific ELISA kit quantifies the amount of that same protein that is phosphorylated on one or more specific amino acids. Instead of a second pan-antibody for detection, this assay uses an antibody that specifically recognizes an epitope that is only present on a protein when it is phosphorylated specifically (i.e., it is phosphospecific).
We recommend running the total and phosphospecific ELISAs simultaneously with the same samples. If this is not possible, make sure to test the same samples with both kits as soon as possible.
Does the IgG Subclass Human ELISA Kit (Cat. No. 99-1000) work with serum from cynomolgus monkeys? What about other nonhuman primates?
No. A customer notified us early in 2014 that Cat. No. 99-1000 did not detect IgG subclasses from cynomolgus monkeys. As far as other nonhuman primates are concerned, we do not know if this kit will work with samples from these animals.
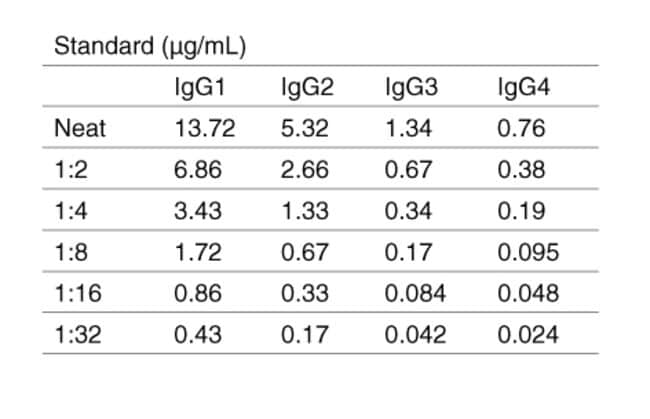
What can you tell me about the Human IgG Subclass Standard included in the IgG Subclass Human ELISA Kit (Cat. No. 99-1000)?
In the IgG Subclass Human ELISA Kit (Cat. No. 99-1000), the human IgG Subclass Standard is Part Number 50287HK. Each batch of 50287HK is calibrated against a WHO reference standard designated 67/97. More details about this standard are in the abstract from Klein F et al. (1985) Clin Chem Acta 150 (2):119-127.
What can you tell me about the mouse monoclonal anti-human IgG subclass antibodies used in the IgG Subclass Human ELISA Kit (Cat. No. 99-1000)?
In the IgG Subclass Human ELISA Kit (Cat. No. 99-1000), Part Numbers 50270HK, 50271HK, 50272HK, and 50273HK are monoclonal antibodies with the clone numbers HP6069, HP6002, HP6047, and HP6023, respectively. These are the clones referred to in the IUIS/WHO study that we cite (Jefferis R et al. (1985) Immunol Lett 10:223-252 [PMID: 3899923]). HP6069 is an IgG1? with 100% specificity for the human IgG1 Fc; it has a pI of 6.4 (6.3-6.8). HP6002 is an IgG1 with 100% specificity for the human IgG2 Fc; it has a pI of 7.1 (6.8-7.4). HP6047 is an IgG1 with 100% specificity for the IgG3 hinge region; it has a pI of 6.6 (6.5-6.7). HP6023 is an IgG3? with 100% specificity for human IgG4 Fc, but it cross-reacts by about 18% with IgG3; it has a pI of 7.7 (7.5-7.9). In Cat. No. 99-1000, each of these mouse anti-human IgG subclass antibodies is labeled with FITC, which is necessary for the capture step.
Three of these subclass-specific antibodies are sold as stand-alone, unlabeled products: Cat. No. A10630 (HP6069), Cat. No. 05-3500 (HP6002), and Cat. No. 05-3600 (HP6047). Clone HP6023 is only available biotinylated (Cat. No. MH1542) and conjugated to HRP (Cat. No. MH1742).
How does the IgG Subclass Human ELISA Kit (Cat. No. 99-1000) work?
In the IgG Subclass Human ELISA Kit (Cat. No. 99-1000), all of the wells of the 8-well strips provided are coated with a goat polyclonal anti-FITC antibody, which serves as a general capture reagent. When you add the individual FITC-labeled, subclass-specific monoclonals to the wells (step 2 in the assay procedure on page 2 of the manual - https://tools.thermofisher.com/content/sfs/manuals/PI99-1000_Human%20IgG%20ELISA%20Kit%20Rev%201208.pdf), they bind to the goat capture antibody. This second layer of the ELISA sandwich now performs the subclass-specific capture function. When you add samples (i.e., serum, standards, and controls) to the wells, any human IgG present in the samples will bind to the subclass-specific antibodies that are captured on the plate via their FITC labels. The subclass-specific detection is enabled by each of these subclass-specific mouse monoclonal anti-human IgG antibodies provided in the kit. The actual subclass detection occurs after you add the HRP-labeled anti-human IgG antibody and the TMB chromogen solution to the wells. The amount of each IgG subclass is determined separately in its own set of wells.
An example of one of these subclass-specific sets is shown under step 1 in the assay procedure on page 2 of the manual - https://tools.thermofisher.com/content/sfs/manuals/PI99-1000_Human%20IgG%20ELISA%20Kit%20Rev%201208.pdf. In this case, the setup shown is for IgG1, but if you wanted to measure only IgG4, for example, you would follow the same setup. However, instead of loading these wells with mouse anti-human IgG1, you would use the mouse anti-human IgG4 instead. If all you want to detect is IgG4, the rest of the wells in the plate can be used for other samples instead of additional standard curves for the other subclasses and their respective samples. However, we suggest running a standard curve for the IgG subclass of interest on each plate that you prepare, and each time you run the assay.
The control in the kit consists of lyophilized human serum, and the human IgG standard provided contains all four subclasses at the concentrations indicated on the lot-specific manual. Even though you may want to measure only 1 or 2 subclasses, you'll be using a standard that contains all of them. The other 3 subclasses don't interfere with detection of IgG3, for example, because the capture antibody is IgG3-specific. The detection antibody in the kit is an HRP conjugate of an anti-human IgG that detects all of the subclasses equally effectively and detects all of the human IgG captured in the wells.
Note that the antibody-coated plates in the kit come as 8-well strips that you snap into the frame provided. You do not have to run an entire plate or both plates at one time. Store any unused 8-well strips at 2-8 degrees C and keep them dry. Unused wells in individual strips should be sealed securely to prevent the entry of moisture while running the assay.
How do I develop a sandwich ELISA using Antibody Pairs?
Each Antibody Pair kit contains capture (coating) antibody, biotinylated detection antibody, recombinant standard, and streptavidin-HRP. Other reagents required are listed in the Antibody Pair manual included with the kit, and can also be purchased separately (Antibody Pair Buffer Kit, Cat. No. CNB0011; 5X Assay Buffer, Cat. No. DS98200; etc.). The manual also provides a specific procedure and illustrates an example of a standard curve that can be obtained when the specific procedure is followed.
A general procedure is summarized here:
1) Coat the microplate with diluted capture (coating) antibody overnight at 2-8 degrees C; wash the plate.
2) Incubate the standards or samples in the coated microplate; wash the plate.
3) Incubate diluted biotinlyated detection antibody in the plate; wash the plate.
4) Incubate streptavidin-HRP in the plate for 15-45 min; wash the plate.
5) Incubate the plate with TMB substrate for 10-60 min, and then stop the reaction with Stop solution.
6) Read the microplate at 450 nm.
We recommend determining optimal buffer formulations, concentrations, and incubation times for individual applications.